


NOTE: These troubleshooting instructions apply to LED strips from any manufacturer/supplier, not just strip lights purchased from InStyle LED. (In fact, our LED strip lights use the very highest-quality components, so they’re extra reliable and fully backed with a 5 year warranty so please check us out!)
Overview:
This guide covers troubleshooting for all LED strips that run on 12V or 24V. That includes white, single-colour , RGB, RGBW and dual-white LEDs.

Problem: MY LEDS ARE FLASHING
Reason:
If your LEDs are flashing in a regular, consistent sequence (e.g., on for 1 second, off for 1 second, then on for 1 second again), then your power supply is overloaded! This means you have too much striplighting connected to that power supply.
For example, if you have 10m of LED strip that draws 5 watts per metre, the strip requires 50W in total (whether it’s two 5m strips or 10x 1m strips, it still adds up to 50W). If those strips are all powered by a 30W power supply, this will go into overload protection mode, which means it will turn on, realise it is overloaded and immediately turn back off again, then keep repeating this cycle.
Or you could get another power supply of the same size as you already have, and split the strips across 2 power supplies.
Or perhaps your project will allow you to reduce the amount of strips onto that power supply.
Problem: MY RGB/RGBW LEDS ARE SHOWING A DIFFERENT COLOUR IN SOME SMALL SECTIONS OF THE STRIP (e.g., 100mm not working)
Reason:
Are your LED strips working fine for most of their length, except for one section or a couple of sections within the cutpoints of the tape? (e.g., when you select Orange, a 50mm or 100mm section shows Green only.) Well that means the Red LEDs within that section are faulty. You can easily confirm this – if you set the strips to just Red then on that section they will be completely unlit, and if you set to Purple that section will show Blue only.
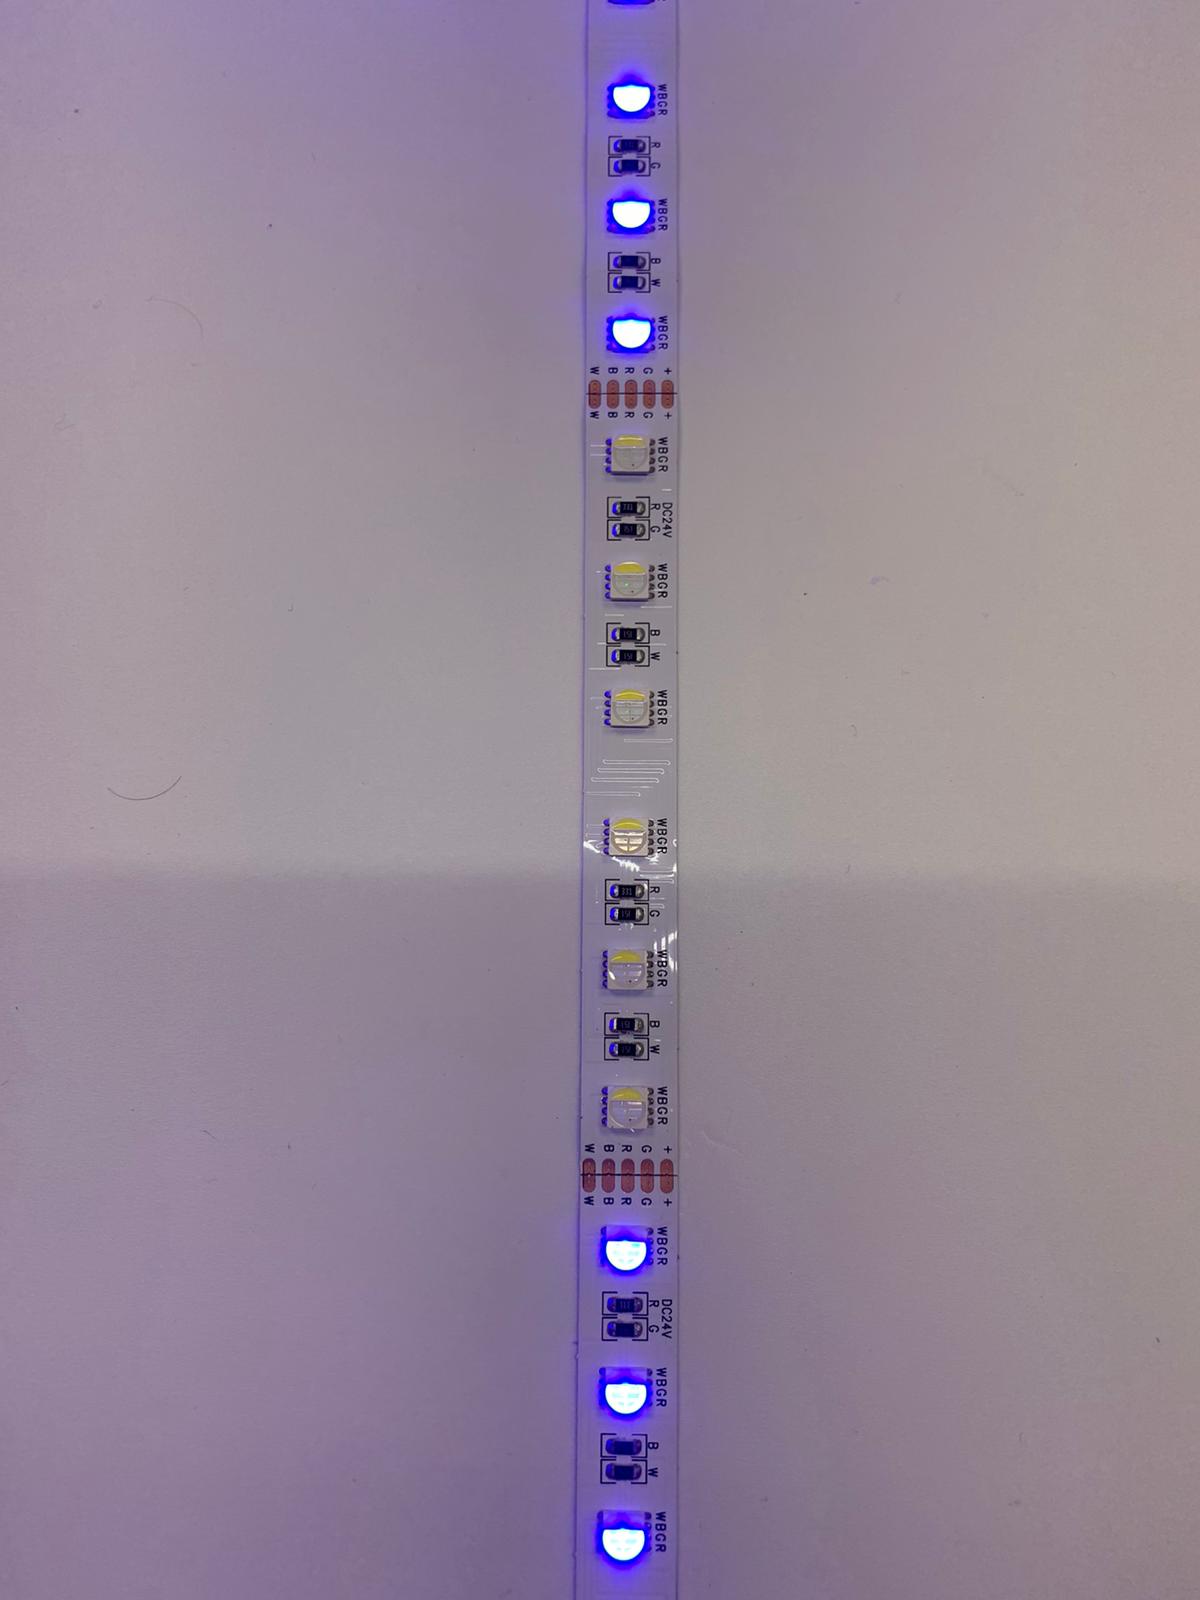
LED strips are made up of 50mm / 100mm sections (sometimes other sizes), and wired in a way that means each section is a discrete, enclosed circuit (in other words, if a LED or resistor is damaged it will only effect the section of strip within the cutpoints).
If the complete section between cutpoints is not working, this is a very similar problem to a damaged LED or resistor – most likely caused by a dry solder joint.
In most cases here the only option is to replace that section of the strip. You can do this by swapping the full strip. Or you can get another, say for example, 100mm section and solder this in – or you can use connector clips to clip in a new 100mm section.
Before taking this step, it’s worth attempting to touch or press down on the LEDs/resistors in the faulty section – in the best case possible, you may see that the light miraculously comes back on; in this case the problem is a dry solder joint, and if you’re capable of soldering you can repair this strip!
Video walkthrough:
Problem: MY RGB/RGBW LEDS ARE SHOWING A DIFFERENT COLOUR (full colour is affected or not working)
Reason:
If all of the LED strips colours are working except for just one colour, and this is affecting that colour all along the strip (e.g., the whole length of the Red colour LEDs are not working), then there is either a fault with the soldering of the Red -ve cable onto the strip’s PCB, or else Red cable is faulty from the strip to the receiver, or the connection of the Red cable into the receiver is faulty or disconnected.
Check the cables between the controller and the strip, especially if you have extended them with a connector block. An effective test would be to wire the power supply directly to the strip, thus cutting out any extension cables and any control gear. And note that black is always positive (+) for RGB/RGBW strips. so start by wiring the positive from the power supply to the black cable on the LED strip. Then wire the -ve from the power supply to the cable for the colour that isn’t working.
Let’s imagine that it’s the blue cable that is not working. In such a case, you should then see that the Blue lights will light up, proving that they work – which means you have a bad connection somewhere else. With this knowledge in mind, rebuild the system step-by-step, adding the controller (and extension cables if you have them) and see which component makes the Blue lights stop working.
(If at this point the Blue does not work at all, then check if its cable has come off the solder pad on the strip, as this is the only reason left as to why it would not work.)
Problem: MY LEDS ARE VERY HOT TO TOUCH – ALMOST BURNING
Reason:
This problem has two possible causes. Either (A) You you have a 24V power supply connected to 12V LED strips. Or (B) there is a ‘short’ along the strip – in other words the solder has gone across the PCB somewhere and the +ve and -ve are touching, shorting the circuit. Or if you have an output cable, the output +ve and -ve may be touching.
If option A is true, with 24 volts going to a 12V strip, then yes the strips will still work. They will in fact be brighter than they should be, as you have double the power going through. But the trouble is that this will damage the LEDs very quickly (usually within hours) and can be a fire hazard.
The same with option B: if +ve and -ve and are touching somewhere, then the strips will fail within hours and LEDs will be be damaged. You may even smell burning and this could be a fire hazard,
Solution:
If you have a 24V power supply going to 12V strips, you can resolve this by getting a 12V power supply, or you can find a converter that converts 24V down to 12V (this would wire in between the power supply and the strip).
If you have a ‘short’, you will need to thoroughly check every single part of the strip close up and see if any solder is going across the connections. If so, then you can either resolder, or simply split the solder with a Stanley knife so that the +ve and -ve are no longer touching.
Video walkthrough:
Problem: MY LED STRIPS ARE TRIPPING MY BREAKER
Reason:
This can be caused by two things. You may have a faulty power supply. Or else the inrush current is too high for your breaker.
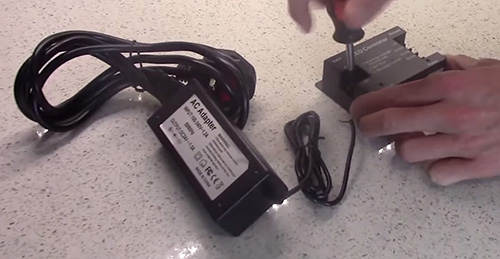
If you suspect a faulty power supply, test it by removing all the power supplies you have on the breaker and try reconnecting them, one at a time – adding another until the breaker trips. Then you know which one is faulty.
Video walkthrough:
Problem: MY LEDS ARE LESS BRIGHT TOWARDS THE END (dull, uneven brightness)
Reason:
You have voltage drop across the strip.
Solution:
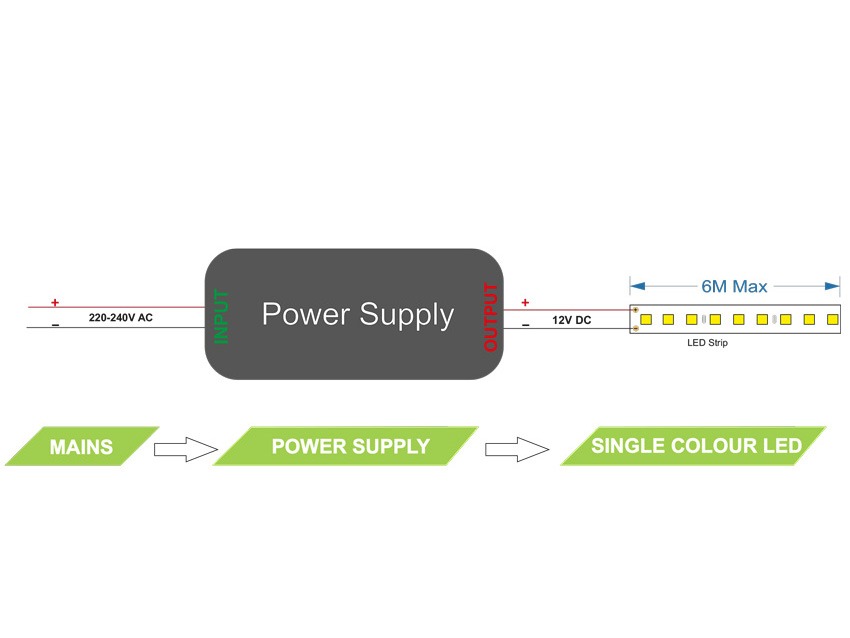
Most standard LED strips can be used in lengths up to 5m, powered from one end, with no voltage drop along the strip that will be visible to the human eye. (some specialised strips can be used in 10m,15m or 20m lengths).
So if, for example, you have joined 2 x 5m strips together and powered them from one end and the strip is less bright towards the end, then you should either: (A) spit the strip up and wire the 2 x 5m strips in parallel, or (B) wire in a ring main with a starter lead and exit lead on the 10m and wire both cables back to the one power supply, as shown below.
 White LED tape – how to wire one LED strip
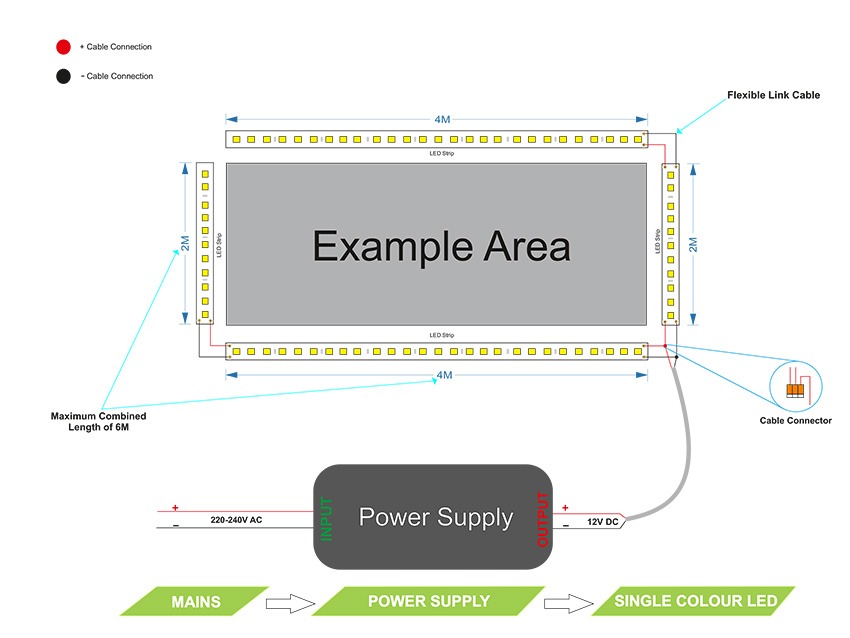 White LED tape – wiring example #1
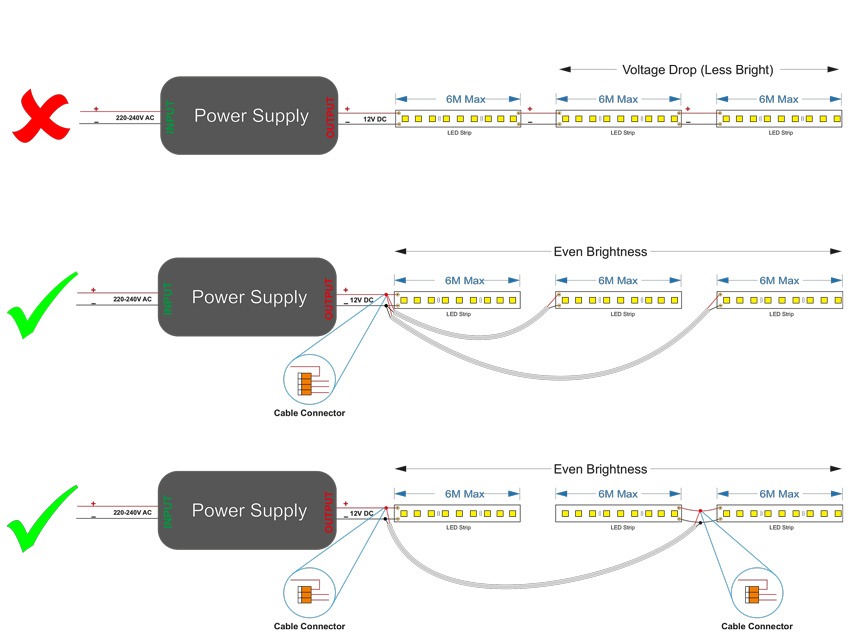 White LED tape – do’s and don’ts
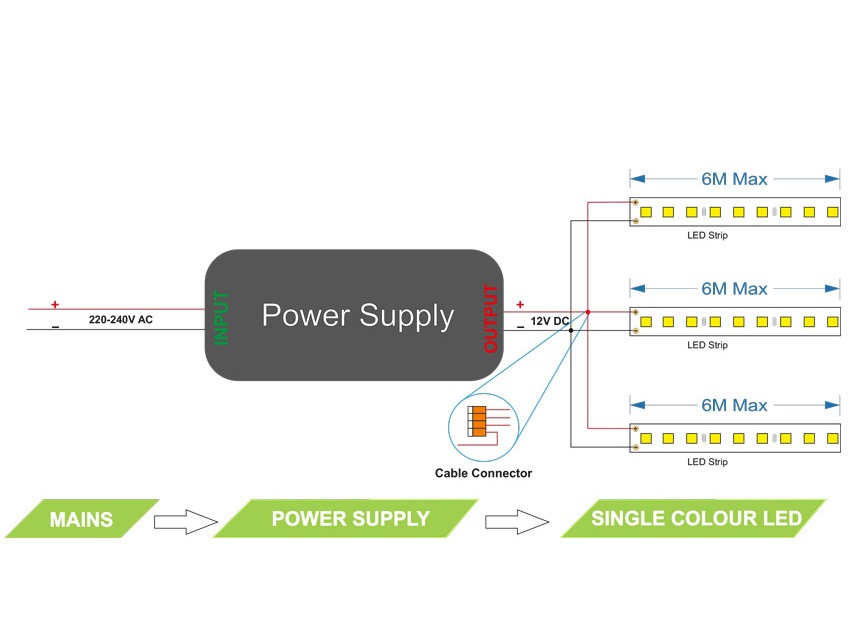 White LED tape – how to wire multiple LED strips
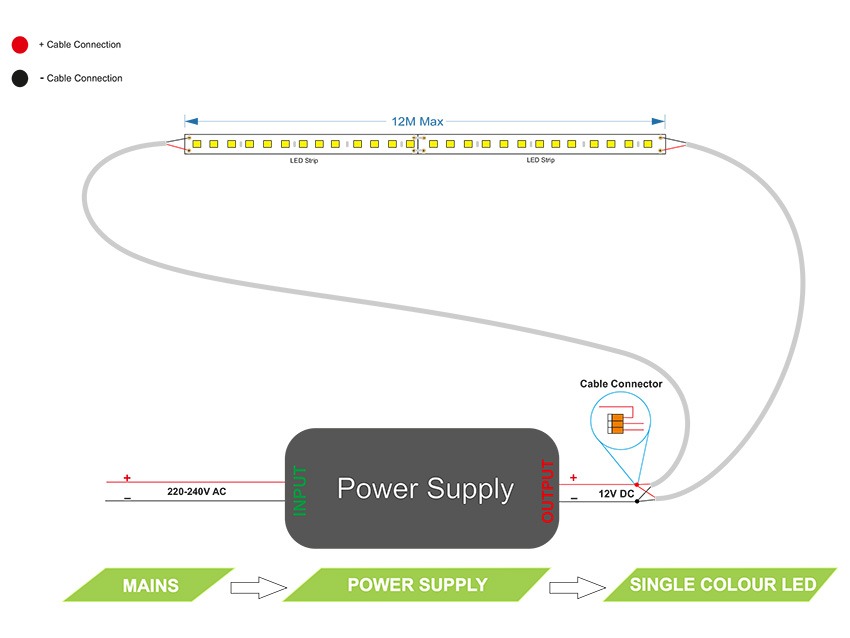 White LED tape – 12m loop
Problem: MY LEDS SMELL LIKE THEY’RE BURNING – WHEN LEFT COILED UP
Reason:
If the LED strips are powered up when left on the reel provided or still coiled up, then the build up of the heat will cause them to get extremely hot and burn out.
Solution:
Only ever test strips when they are uncoiled. They must not be coiled up in any way.
Video walkthrough:
Problem: MY STRIPS ARE SHOWING INCONSISTENT COLOURS IN PATCHES (e.g., cool white strips are showing warm white in sections)
Reason:
You have paint on them! Very simply I have seen this issue hundreds of times, if you have a cool white strip and then in random sections of, perhaps, 50mm you see warm white (or they appear to be completely ‘off’) then this is because they have been painted on.
This happens a lot when the painters come in and paint and do not know that there are LED strips where they cannot see them (inside a coving, for example). Then when you turn them on, bam! – you see the faults.
Solution:
Depending on how much paint there is, the strips can sometimes be saved! You can wipe the paint off the strips. Do not use any water-based products or that will damage the LEDs. You can also scrape the dry paint off the LEDs with a fine knife. Make sure the strips are turned off. I have done this successfully many times, and the strips worked perfectly afterwards.
Video walkthrough:
Problem: MY LEDS WILL NOT LIGHT UP AT ALL
Reason:
If the LEDs will not light up at all, then this could be down to a faulty power supply.
Solution:
If you have several power supplies, then try a different power supply onto the same strip to see if this now works. If it does, then you have a faulty power supply and will need a new one.
Problem: MY RGB/W LEDS ARE ONLY LIGHTING UP A LOW (RED) GLOW
Reason:
You have a 12V power supply going to 24V LED strips.
Solution:
The only option here is to get a replacement 24v power supply for your 24v strips.
Problem: WHEN I SELECT COLOURS FOR MY RGB/RGBW STRIP, THEY ARE ALL WRONG
Reason:
You have crossed over the cables into the controller. If you have wired the Red cable into the Blue terminal and the Blue cable into the Red terminal on the controller, for example, then whenever you select a colour on your controller the colours will be mixed wrongly, so you’ll see different light colours to those you’ve selected.
Solution:
You must check the cables, and re-wire any that are crossed over into the correct terminals. If you have extended the cable with a cable connector you must also check those connections too.
Sometimes the cables can be touching, which can create unpredictable results. If Red and Blue cables are touching, for example, then you’ll need to separate them so the connections are pure and without interference.