


Wiring LED Tapes – connecting transformers, receivers & controllers
How to wire and connect LED strip lights
For an experienced electrician, wiring an LED tape installation is a simple task. But if you’re fitting your first LED strip, then you might have some questions. That’s why we’re here!
We’ve split this LED wiring guide into three sections:
How to connect an LED power supply
1. How to wire the power supply for a single-colour LED strip
Wiring a white LED strip (or any other strip of single-colour LEDs) couldn’t be easier. Simply connect your 240V mains supply (+ve and -ve cables) to the input terminals of your LED transformer, and connect your LED strip’s starter-lead (+ve and -ve again) to the transformer’s output terminals.
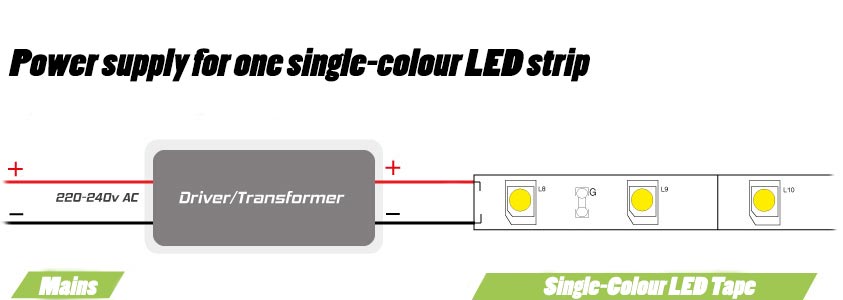
fig 1: Power supply for one single-colour LED strip – wiring diagram

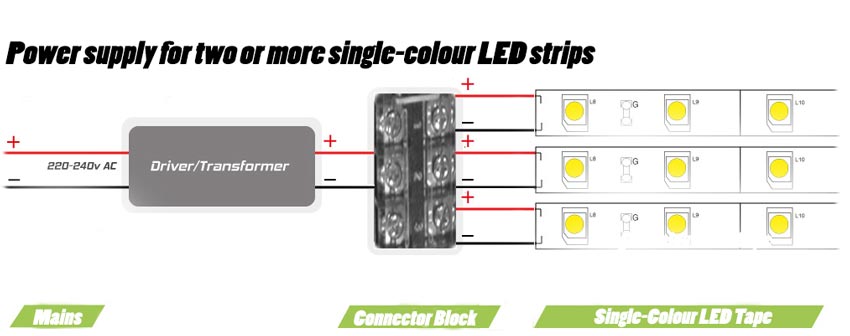
fig 2: Power supply for two or more single-colour LED strips – wiring diagram
2. How to wire a power supply to drive two or more single-colour LED strips
Connect your transformer’s input terminals to the 240V mains supply (+ve and -ve cables), and its output terminals to the connector-block’s input. Then wire each LED strip starter-lead (+ve and -ve) to the connector-block’s output. See the ‘power supply for two or more single-colour LED strips’ wiring diagram (fig 2) for more info.
NB. If you’re going to use a connector-block, there’s a wide variety available, with varying numbers of outputs. So if you’re planning to power just two LED strips, you can get a connector-block with two outputs; if you have six LED strips to drive, choose a connector-block with at least six outputs.
3. How to wire a power supply for dimmable single-colour LED tapes
If you want your white / single-colour LEDs to be dimmable, then you’ll need to add a suitable dimmer to your installation. We’ll talk more choices for connecting a dimmer to your LED strip lights later (see ‘more dimmer & controller options for LEDs’ below), but for now we’ll deal with the very simplest kind of dimmer installation: how to connect a basic inline keypad dimmer to your LED transformer.

fig 3: Power supply for single-colour LED strip with inline dimmer – wiring diagram
NB. If you’re using the transformer to drive more than one LED dimmer, you can use a connector-block as shown in fig 2 above.

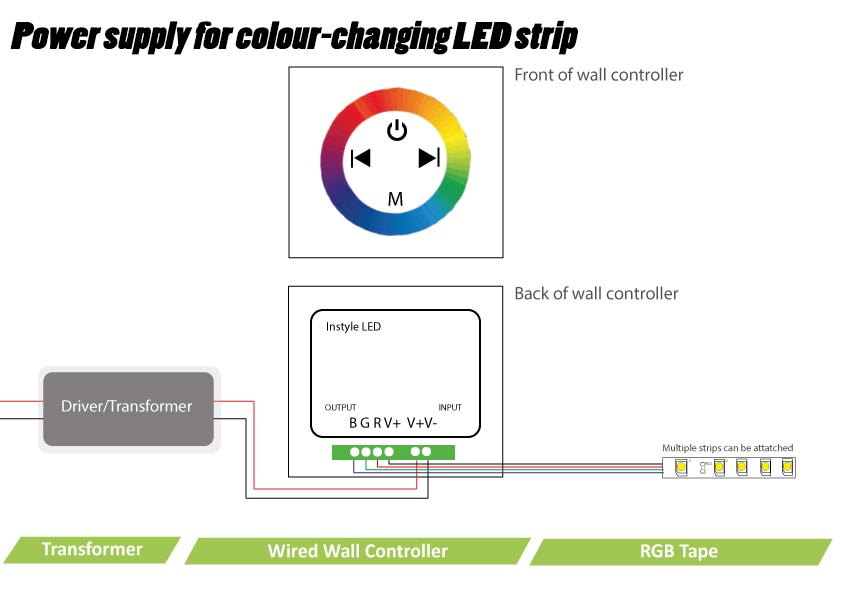
fig 4: Power supply for colour-changing LED strip – wiring diagram
If you’re using a wireless LED controller, then you will also need an LED receiver to receive its radio-frequency signal. See ‘how to connect an LED receiver’ below.

4. How to wire the power supply for a colour-changing (RGB or RGBW) LED strip
To control colour-changing LEDs you’ll need to add a suitable LED controller to your installation. A wired LED controller sits between your power supply and LED tape – like an inline LED dimmer (above).

How to connect an LED receiver
LED receivers pick up the signals sent by your wireless dimmer or controller, and pass them forward to your LED tape. Most receivers will let you control your LEDs from a range of up to 20 metres, enabling you to adjust colours, dim, switch on/off or run preprogrammed lighting effects (depending on the type of wireless controller you’ve installed).
Each LED light-colour you wish to control needs its own channel. So a white or single-colour LED tape can be controlled by a receiver with just one channel, while a colour-changing RGBW LED tape will require a receiver with four channels (one each for red, green, blue & white).
1. How to wire a receiver for single-colour LEDs
Use a single-channel LED receiver for your white or single-colour LED tape installation. (These are sometimes called ‘dimmer receivers’.) To wire it in, all you have to do is connect the LED power supply’s output (+ve and -ve cables) to the receiver’s input terminals, and connect your LED strip’s starter-lead (+ve and -ve again) to the receiver’s output terminals.

See the ‘dimming receiver for single-colour LED strip’ wiring diagram (fig 5 below) for more detail.
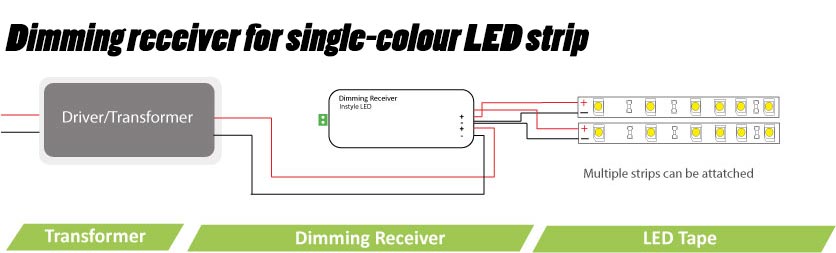
fig 5: Dimming receiver for single-colour LED strip – wiring diagram

See the ‘multichannel receiver for colour-changing LED strip’ wiring diagram (fig 6) for more detail.

2. How to wire a receiver for colour-changing (RGB or RGBW) LEDs
Use a multichannel LED receiver for your colour-changing LED tapes. Wiring is easy: just connect the LED power supply’s output (+ve and -ve cables) to the receiver’s input terminals, and connect your LED strip’s leads (+ve and red/green/blue/white channels) to the receiver’s output terminals.
If you’re using RGB (three-colour) rather than RGBW (four-colour) LEDs, then you’ll only need to use three channels. Simply leave the 4th (white) channel unconnected.
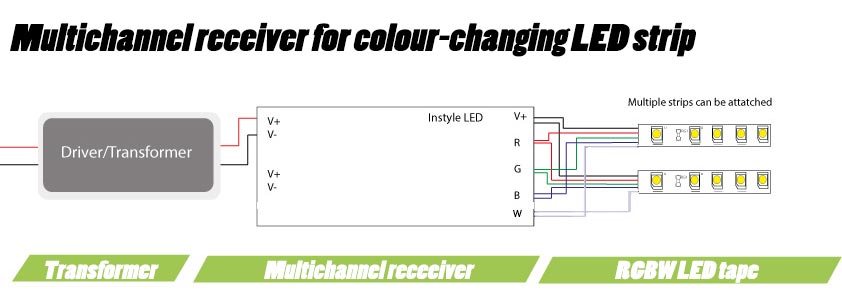
fig 6: Multichannel receiver for colour-changing LED strip – wiring diagram
More dimmer & controller options for LEDs
1. TRIAC dimming
TRIAC LED transformers (sometimes called phase-dimmable or phase-cut transformers) enable you to dim your white or single-colour LED strip lights using a standard household dimmer. Because of this, they’re extremely easy to install and use.

See the ‘power supply for TRIAC dimming’ wiring diagram (fig 7) for more detail.
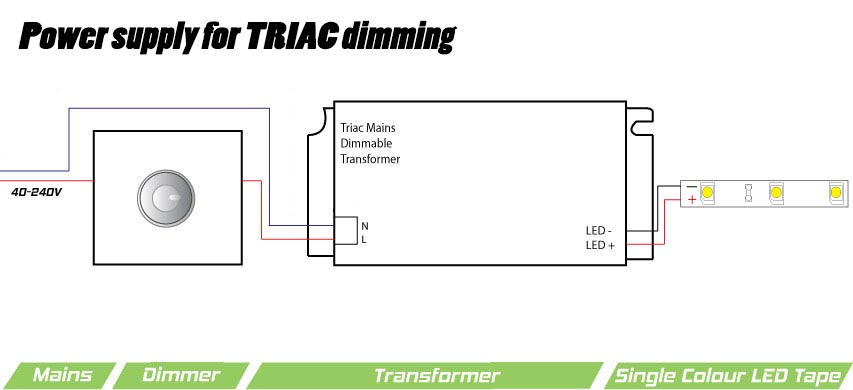
fig 7: Power supply for TRIAC dimming – wiring diagram
2. Wireless dimmers and controls (wall-mounted)
Because they control LEDs via a wireless (RF) signal, wall-mounted wireless dimmer/controllers don’t need to be installed into the circuit that drives your LED strip lights. Most wall controllers are supplied with their own small 9-watt 12-volt transformer, to be wired directly to your mains power supply.
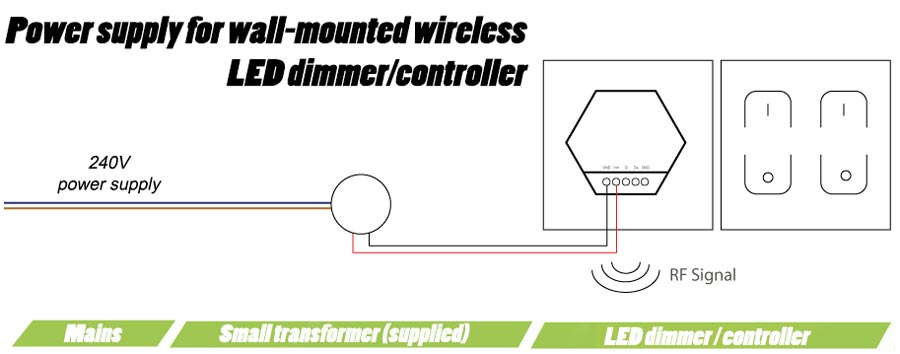
fig 8: Power supply for wall-mounted wireless LED dimmer or controller – wiring diagram
Some wall controllers are powered by their own replaceable lithium battery, rather than drawing power from the mains. (See our desktop dimmer too.) These controllers require no wired connections at all.

3. Remote dimmers and controllers (hand-held)
Powered by replaceable batteries, hand-held dimmer/controller remotes for LEDs require absolutely no wiring.
4. The LED wifi adaptor

The Easylighting app is available for Android and Apple devices. Its easy-to-use interface gives you full control over LED lighting – choosing colours, dimming, switching on/off and a range of other options. The wifi adaptor receives your instructions via wifi, then converts and outputs them as a wireless (radio-frequency) signal that can be picked up by your dimming receiver or multichannel receiver (above).

fig 9: power supply for LED wifi adaptor – wiring diagram